Today I taught a basic sewing class to a few girl friends (with the help of my mom). Each one of us made a set of placemats. I choose this item for the class because although very basic and easy to make, it has a lot of great basic skills that goes into the construction. Plus, everyone would leave with an item they could display in their house. Here are some pictures from the class.
(Tutorial below so you can make your own set!)
And... the finished products!
Reversible Placemat Tutorial
Supplies Needed
30" of fabric for one side of placemat
30 " of second fabric of other side
Coordinating thread
Scissors
Rotary Cutter & Straight Edge
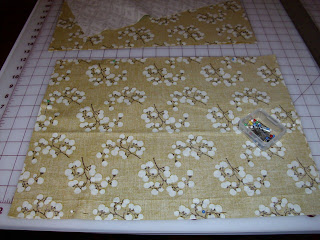
Fold first fabric into quarters.
Use rotary cutter & straight edge to cut a rectangle 18.5" x 12.5. Finshed size will be 18" x 12".
(My table is only 36" so I decided to make my finished size 16" x 12")
(My table is only 36" so I decided to make my finished size 16" x 12")
You will now have one side of all 4 placemats cut. Next do the same for the second fabric.
Now you have 8 rectangles 18.5" x 12.5" (4 of each fabric). Pin one of each fabric face to face for all 4 placemats. The fabric will be inside out for now.
Time for some sewing!
Sew with a 1/4" seam allowance. Start sewing on the short side in the middle of the seam and follow all the way around the perimeter. Back-stitch at the start, each corner and the end. It's ok to run over your stitches at the corners; this just adds more stability.You will need to stop short before closing the seam leaving a 3" opening. Repeat for all 4 placemats.
Clip all corners to remove some of the bulk so when you flip the placemat right-side out the corners will lay flat. (You can see in this picture what I meant by run over the corners - it will form a little x over the corner seams)
Gently pull the fabric through the 3" opening. Use a a stick or fabric turner tool to push out the edges (even a chop stick will work).
Repeat for all 4, until you have crisp pushed out corners.
Time to iron the edges. I like to roll the edge of the fabric between my fingers as I iron to make sure the seam is pulled all the way out.
Make sure to iron down the opening as well. The cut edge will already be folded inside, just line up the ironed edge with the ironed sewn seam.
Next you will top-stitch around the edge of each placemat. I used slightly under a 1/4" seam allowance. Do not back-stitch or over stitch the corners. As you are sewing and come to the corner, slowly stitch to the edge leaving your seam allowance space unsewn. Make sure the needle is in the down position before you turn the corner. Repeat for all 4.
Gently pull on the threads on the "back" side of your placemat to pull the threads through. Tie off all threads and trim.
That's all!
This would make a wonderful housewarming gift for a friend.
*Tip: Roll up the placemats and then use a scrap of fabric to tie a bow around them.
This would make a wonderful housewarming gift for a friend.
*Tip: Roll up the placemats and then use a scrap of fabric to tie a bow around them.
Mix and match your placemats by alternating since they are reversible.
Or this is a great tutorial to make holiday placemats.
(Thanksgiving on one side and Christmas on the other)
Or this is a great tutorial to make holiday placemats.
(Thanksgiving on one side and Christmas on the other)


No comments:
Post a Comment